Wednesday, August 1, 2012

Wooden License Plate Valances

I debated about making traditional curtains for Carter's nursery, but decided rustic valances fit much better with the rest of his room and would allow us to incorporate a few more license plates.

This project was very simple and only required one 8' pine board. Each window is approximately 3' long so Eric built 2 simple wood valances.


We stained them to match the rest of the furniture in the nursery and used screws to attach 3 license plates to each panel.


We hung them above each window using two L brackets.


So simple, but love what they add to the room!


Go here to see the complete nursery tour.


Monday, July 30, 2012

Armoire to Dresser Transformation!

When we first started working on the nursery I posted about how Eric took this broken armoire


And turned it into this:


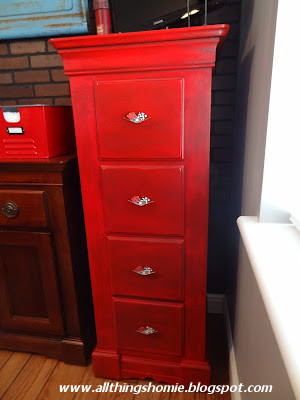
After Eric had it all reassembled it was ready for a new coat of red paint.


Then I added a coat of glaze to give it a vintage aged look.


It fits perfectly in the corner of his nursery and I love the extra storage!


One of my favorite additions is the new Corvette drawer pulls we bought from Hobby Lobby.


So glad I have such a handy husband, this is the perfect piece for Carter's Chevy nursery!


Tuesday, July 24, 2012

Carter's Vintage Chevy Nursery Reveal!

Over the weekend we were finally able to put the finishing touches on Carter's nursery. Of course we have a few more things we would like to do, but for the most part it is ready for him to arrive!

We went with a vintage Chevrolet theme, not your typical nursery decor, but it was so fun to do! A lot of it was DIY and I'll have a few more tutorials to post about soon.
Here is what the room looks like when you walk in the door:

And the opposite wall:

We have the glider I reupholstered and posted about here. With the beautiful quilt I received as a shower gift. My mom found the red ottoman which also serves as a great place to tuck away his books.

We found this 57 Chevy shelf at Hobby Lobby and it was the perfect place to display Carter's custom license plate (also a shower gift).


Above the closet we hung vintage Canadian and Mexican license plates I found on ebay to represent Carter's heritage.


Instead of curtains, Eric built wood valances so we could incorporate some California and Montana license plates.

I posted awhile ago about making the crib bedding here, here, and here. I couldn't find anything premade that went with our theme/my vision of the nursery so I found some fabric and made my own.

Before we knew if Baby O was a boy or girl we decided on names and I found this at an antique fair. Not only did it say Carter, but my mom is from Montana so I figured it was meant to be!


The other wall has a collection of Chevy items from Hobby Lobby.


I made a mobile to hang above the crib by spray painting a metal wreath form and hanging felt tools from Ikea from chain.


One of my favorite parts of his room is this old rusty tailgate we hung on the faux brick wall I posted about here. This was a craigslist find we anchored into the wall over his changing table. The little metal tools next to it are also from Hobby Lobby.


I've also posted about the broken armoire Eric upcycled into this fabulous tower of drawers here and how we painted it here. We added Corvette drawer pulls from Hobby Lobby.


I found some red metal bins at Target that I've used to organize the diapers on the changing table and the little red motor oil cup next to it holds his diaper cream and hand sanitizer.


Lastly, we found this amazingly soft navy rug at Homegoods, somebody has already staked his claim ; )


We are so thrilled with how it turned out, now we just have to wait on Carter to make his appearance!


Thursday, June 28, 2012

Etched Whiskey Glasses

Yesterday was my brother's birthday and these etched whiskey glasses were the perfect personalized gift!
I started with some nice glasses from Macy's.

Added a vinyl stencil with a graphic I made out of his initials using my Silhouette machine.

Put the glasses in a pyrex and held them in place with dish cloths (very fancy, I know!) and covered the initials with etching cream.

I usually wait much longer than the instructions, this time I left the cream on for about an hour, to make sure the etching is nice and even. Wash it off, remove the stencil and you're left with these personalized glasses!


An easy gift and you could modify this so many different ways!


Wednesday, June 27, 2012

Faux Brick Wall

We've been working hard to finish up our projects in the nursery, but it seems like lately we've just been adding more things to the list. One of those projects was adding a faux brick and I'm so glad we decided to go for it, the brick makes such a difference in the room!
To simplify the installation we chose to install the brick on this wall where there aren't any windows and where the changing table will go.


Lowe's sells brick paneling in 4 x 8 sheets (similar to bead board) so we needed two to cover this wall.


We could have just put up the first one and cut the second to size, but we didn't want the seam to be completely obvious so Eric notched out the half brick all the way down and we put it up starting in the corner and securing it to the wall with a few black screws.


Then we notched out the second piece and carefully fit them together. To get everything to fit as close as possible this involved filing a few of the bricks until the puzzle pieces fit just right. The scraps we pieced together above the door and used black caulking to fill in any of the seams.


For being faux brick paneling, the wall looks great! It adds so much character and just what this room needed.


I'm glad we spent the time and energy to add this and I love how it turned out!

Wednesday, June 13, 2012

DIY Upholstery Experiment

Although my posts have been few and far between we've been busy working away to get the nursery ready. I've been hinting I had quite the ambitious project coming up and I was so intimidated that I kept pushing it off because I didn't think it would turn out.

Well I'm happy to report we have a great new addition to the nursery that is going to get plenty of use!
I've looked everywhere for an upholstered glider that would match the nursery. I was really hoping for something gray, navy, or red. The selection of gliders in those colors is very limited; they cost a ridiculous amount of money and nothing was quite the right size.
A few months ago my mom and I stopped by a local high school fundraiser and found this amazing glider.

It was originally from a very expensive childrens boutique, the perfect size and extremely comfortable, just not quite the right color. No problem, for $20 I figured I could easily have it recovered.
After getting several quotes, I wasn't sure if I was willing to pay the $600+ dollars it would cost to have it redone and debated about buying a new glider in a color I didn't really want.
After watching this great tutorial series from Tip Junkie I wasn't as terrified of ripping it apart and decided to give it a shot. I started by carefully disassembling the entire chair.


Until I was left with this:


Then it was time to reconstruct the chair with my favorite helper.

The toughest part was keeping everything tight and in position while it was being stapled down. With a little help from my husband and a bit of patience I am thrilled with the result!

I used the same navy blue material from Eric's baby bassinet redo. It looks great in the room and now I'm on the hunt for an ottoman.

We've made quite a bit of progress to finish up the room, but it seems like the to-do list just keeps growing!