Tuesday, February 28, 2012

Making the Most of a Small Bathroom

When we bought our house 3 years ago our only bathroom looked like this:

Since we were already doing some other remodeling we decided to gut the bathroom before we moved in. We literally took it down to the studs and when my husband removed the old bathtub he found this:


Yes, 6 mummified mice. AND he was nice enough to leave them by the front door so I could see them when I got home from work! We live on a raised foundation so I guess it's common for mice to climb up under the tub in the winter to stay warm.

I'm sure you're so glad I shared that picture with you = ). Here is the after:


To make the room seem as big as possible we used the same tile in the shower as we did on the floor. We didn't want too many different patterns and textures in the same tiny room.

We also had an alcove tiled in the shower and use a dispenser to keep our shampoo, conditioner, and face wash. This keeps the tub cleaner and frees up space since there aren't bottles trapping water on the ledge.


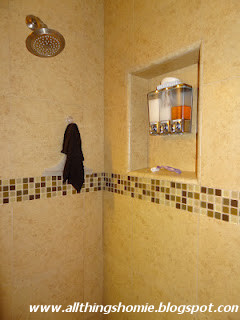
A suction hook works great to hold the squeegee and wash cloths.

We also installed a curtain tie back on the side of the vanity to hold back the shower curtain and liner when the shower isn't in use. It makes the room look better and opens the space a bit.


We have a medicine cabinet mirror to hold toothbrushes and face wash. Ours isn't anything fancy but I've seen some pretty nice framed mirror ones lately so we might be switching that out soon!


Instead of installing a towel bar, we bought a large brushed nickel command hook to hold the hand towel. The towel tucks nicely on the side of the white cabinet between the mirror. And there is no damage to the cabinet if we want to change it up later.


We have similar command hooks on the back of the door to hold our towels. Our doors fit pretty snug in the frames so an over the door hook wouldn't work and our doors are original to the house so we didn't want to drill holes into the wood.


We've been wanting to get the bath mat off the floor when we're not showering since it's this guy's favorite place to lay:


Which I wouldn't mind so much if it didn't mean it was covered in dog hair all the time. Not quite what you want to put your nice clean feet on when you get out of the shower!

So last night I asked my husband to install another towel bar on the lower portion of the door.


Just what we needed! It works perfectly behind the door and you would never even know it's there!


We're planning on adding a master suite to our house in the next few years so we won't need to cram so much in this little bathroom, but for now it works perfectly for us!

What have you done to maximize space in your home?


Thursday, February 16, 2012

Meal Planning and Cleaning Schedule

One of my goals for this year was to eliminate the many trips to the grocery store each week and actually do some meal planning. Well, we're nearing the end of the second month and I haven't been super successful. I've been trying to make it to the gym a few nights a week and with my husbands unpredictable work schedule some nights we don't have a lot of time or energy for food prep. This is where I'm hoping meal planning will help! If I spend a few extra hours on Sunday getting everything together we can eat easy, healthy meals all week long.

Yesterday I was reading Brown Paper Packages and Kierste has a great print out for her daily, weekly, and monthly cleaning. My house could definitely use some more cleaning so I thought I'd make up a few of my own!

Here is what I came up with for our cleaning schedule:


I'm going to laminate this and hang it on our refrigerator so I can check off something each night. I'm hoping this will help me stay on track so the dirt (and dog hair!) don't pile up.

I also made something similar for meal planning:


Same idea, using a white board marker to fill in the blanks each week will help me keep track of what I need to prep the night before and what groceries we run out of.

Wish me luck! I'll let you know how well it works out...

Tuesday, February 14, 2012

Candlestick Makeover

Hope everyone is having a very Happy Valentine's Day! 

We made a bit more progress on the backyard and the kitchen shelves over the weekend, and I finally got these candlesticks painted and in the house!

These were all Goodwill finds, the white one in front is originally from Pier 1 and when I bought him about a year ago he looked like this:


Nothing a little paint can't fix! He got a few coats of primer and white paint. A few months ago (yes I've been meaning to paint these candlesticks for quite some time) I found these two:


They don't look so bad as is, but the paint was a creamy color and starting to flake off in places. I gave them a good scrubbing and a few coats of gray paint. Since the original paint was flat I didnt even bother priming these ones.


I added some gray and white candles I already had on hand and they are now living happily next to the china cabinet!


I'll be taking down our Valentine's Day decor tomorrow and have a few little St. Patty's projects in mind!


Thursday, February 9, 2012

Let's Just Start Another Project...

I don't know what it is about 2012 but it seems like we never have enough time or motivation and none of our projects are quite complete before we start a new one. Let me introduce you to Home Improvement Goal #4: Backyard Makeover!

Here is a picture of our backyard when we bought the house 3 years ago.

It's nicely landscaped with sprinklers/drip to keep all the plants alive, but it's certainly not what we would have done if we were landscaping. Our lot is fairly large, but the backyard is divided up into multiple sections. Last year we removed the chain link fence blocking off the last 10 feet of the yard and yesterday I came home to this:


Eric has been wanting to take out both the mulberry trees to open up the space and eliminate the need to trim them back to their nubs every year. Yesterday, he and his dad took one down to the base and hauled everything out to the curb and cut down most of the other one.


It has already opened up the yard so much, and I know they have big plans to finish it up this weekend. Let's just hope this dry California winter holds out for a little longer so we can get enough done and get the yard ready for new plants this spring!


Wednesday, February 8, 2012

Rub 'n Buff Frame Transformation

I've been looking for a long skinny frame for a chalkboard project and stumbled upon the perfect custom framing reject at Michael's for only $8!


Black wasn't going to work for our house but I've been wanting to try Rub 'n Buff so this was the perfect project! This little tube was only $4 at Michael's (plus you can use a 40% off coupon) and I only used about a third of it. It says it covers up to 20 sq. ft. 


The directions say you can use a brush, rag, or your finger and you pretty much just smear it on the surface and rub in circles until it's covered and shiny.If my frame had more detail I would have used a brush but since it was pretty smooth I just rubbed it on with my finger.


I was amazed at the transformation! Just one good coat and you would never know it used to be black. Make sure you do it somewhere you can let it dry for awhile. I let mine sit overnight just to be safe.


Hopefully we can get a board cut out tonight and I'll be able to reveal my chalkboard soon!


Tuesday, February 7, 2012

Valentine's Canvas

If you're on Pinterest I'm sure you've seen this picture.


I've seen the saying incorporated in home decor, but it's so perfect for Valentine's Day too! I have a few extra canvases lying around so I thought I'd make my own.

I started out by painting the canvas with several coats of red acrylic paint.

Then I added white vinyl letters cut from my Silhouette. I prefer to use masking tape instead of transfer paper because it's cheaper and much easier to work with. I laid the words down and played with the layout a bit until it was just right.

Once I had the letters pressed down I added a few paper hearts to the front and hot glued some ribbon around the edge.

I love what it adds to our console table.


But adding this meant I also moved around a few other things and finally got our china cabinet just right.


I have one more Valentine's project to finish up and I'm all ready for next week!

Friday, February 3, 2012

Progress... Home Improvement Goal #2!

The first month of 2012 has flown by and I'm still lacking the energy and motivation to tackle our list of projects! There are a few things holding us up, but that only means there should be a flood of new projects in the next month or two! Thankfully my husband has been working away on making new kitchen shelves (Home Improvement Goal #2!)

If you remember, here is our kitchen before the paint makeover!


It's not very easy to see in this picture but on the edges of the upper cabinets we have 3 shallow shelves. Since we raised the upper cabinets to accomodate our new refrigerator, we also had to cut down the shelves by a few inches.

Here is a better shot of what they looked like once they were cut to size and painted white. If you notice, there is a small gap above the shelving that was originally covered by several pieces of molding. We painted those white as well, but it just didn't look quite right when we put it all back together.


So instead we started back at square one. 


Eric measured and measured, and then cut pine boards to make custom shelves that fit the space perfectly and wouldn't need extra molding. It has been a somewhat tedious process since not every wall is perfectly straight and every piece has to be cut and fit and possibly cut again, but they are built!

We decided to go with a two shelf design instead of the original 3 so we could use them for more than short knick knacks! They will still be a challenge to decorate, but I'll show you what I come up with once we get them primed, painted, and hung!