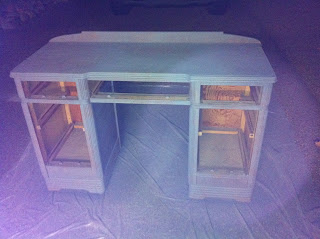
Wednesday, August 31, 2011

From Christmas Tins to Tiered Fruit Bowl

I’ve seen lots of tiered stands lately and thought I’d create my own. Originally I was looking for old metal pie pans, but when I saw these two beauties ($0.49 each) I figured I’d give it a shot.

I was planning on putting them out on our back patio so I primed and painted them red.


Once they were dry I took a tall wooden candle stick ($0.99) and glued it to both tins.


Here is the finished product:


I put it in my kitchen to test it out and am thinking about leaving it there, so it may be getting another makeover to a color that will go better with the kitchen.

Not bad for a few dollars!

Tuesday, August 30, 2011

Thread Board

One of my best friends had this mirror from Ikea:
When the mirror broke, she gave me the empty metal frame. It took me awhile to figure out what it was going to be…..I debated about making a bulletin board or a jewelry rack, but finally realized it would be the perfect place to organize all my sewing thread.

The frame is rather large (22”x22”) so it will hold a lot of thread. I took a trip to Lowe’s to pick up some peg board ($5) and a few wooden dowels ($0.60 each) and got to work.

Patience is not a virtue I possess and I couldn’t stand to wait for my husband to get home and cut the pegboard down, so I painstakingly cut a 22”x22” square with one of his hand saws. I use his drill all the time, but I wasn’t brave enough to break out the electric saw… there was no one else home to take me to the hospital!

A few hours minutes later I had my square cut and the dowels cut in 3.5” segments. The dowels are the perfect size for the holes in the pegboard; I just used a little hot glue on the back side to hold them securely in place.

 I sprayed the pegboard and dowels with white primer and paint.


Poking the dowels in styrofoam helps make sure they get an even coat of primer and paint.


I sprayed the frame with primer and Krylon “Classic Gray” spray paint.


Once it dried I just had to put the board in the frame and hang it on the wall. Viola!


I need to buy a few more dowels to fill up the pegboard and hold the rest of my thread stash, but it’s so nice to have the thread out and easily accessible, now I can get to my long list of sewing projects!

Silhouette Magic

One of my favorite and most used things is my Silhouette machine. When I first started reading craft blogs I kept seeing amazing projects that were all done with a Silhouette. I had never heard of it before, so I started doing some research.

I already had a Cricut machine which I had used for a few wedding projects and showers, but I hadn't invested in many cartridges so I was pretty limited with what it could do.

Once I started reading about the Silhouette SD I knew I HAD to have one! Instead of cartridges, it's a computer program that allows you to cut out lettering in any font you have (or can download), it comes with lots of cool graphics and has millions more that you can download for as little as $0.99! They even have a free graphic you can download each week to build your library. And you can import your own designs. It can print and cut out paper, fabric, interface, vinyl, and can even make rhinestone iron-on designs and temporary tatoos!


I use mine several times a week and I haven't had a chance to read all the tutorials so I'm sure I don't know even know half the stuff it can do!

These are a few projects I've done using my Silhouette:

KitchenAid Mixer Graphic:


Tiered Dessert Stand:
Family Sign:

Nursery Sign:


And soooooooooooooo much more! I'm learning new things everyday! Do you have a Silhouette? What do you use it for?

Wednesday, August 24, 2011

Spare Room Redo

We bought our house almost 3 years ago and we spent the first few months giving it an overhaul before we moved in. This is what our spare room looked like when we bought it. Needless to say, we spent countless hours peeling wallpaper and getting the walls ready to be retextured.
This terrible picture shows what the room looked like after we had the walls textured, painted, and the original wood floors redone. As you can tell we still had Ikea furniture and hadn't had the blinds installed yet.
Awhile ago, I found these two nightstands at Goodwill for $6.00 each. I loved the detail and thought they would work perfectly in our spare room.
You can tell they were in rough shape, but a little primer and gray paint and now they look like this:


On the other side of the room is the vanity (posted about here) and the chair and table I redid (posted about here). 
Still on my to-do list: a new bedskirt (all the pattern is a little too much for me), a throw pillow, and a padded headboard. What else should I do with the room?

Tuesday, August 23, 2011

Curbside Trash Vanity

Last spring my parents neighborhood was having their bulk garbage pick up. One of their neighbors put out an antique vanity that had definitely seen better days. The stain was worn off, the wood was chipped in some places, and it looked like it had been sitting outdoors. The drawers had potting soil it them and there were water rings covering the top, but I thought it would be a good project for me to work on! 

I forgot a true before picture, but this is what it looked like after a coat of primer:
I gave it a few coats of paint and added some girly butterfly knobs and it looked much better!
This vanity didn't have a mirror and was going in our spare room which has mirror closet doors so I decided to do something else above the vanity. I found this empty frame at Goodwill for a few dollars:
I painted it to match the vanity and stapled chicken wire behind the frame.
Here is what the vanity looks like know. The chicken wire frame is the perfect place to hang necklaces and earrings. The rest of the vanity is filled with my other jewelry. This year my new years resolution was to wear more jewelry instead of the same pieces everyday. So far I haven't been too successful, but I'm hoping this will help!

I found the tiered stand on the right at a garage sale for $3. It was originally red so I painted it blue.


The antique flowered dish was a salvation army find for $2. On the left is an antique wedge wood canister and bird ring dish from World Market.
I still need to fill the smaller frame with a piece of mirror and finish a vanity seat, but I love having my jewelry out and easily accessible.

I'm linking up to Primp, Primitive and Proper, and A Diamond in the Stuff!


Tuesday, August 16, 2011

Sacramento Antique Faire

Last Sunday I went to the Sacramento Antique Faire with my parents and my good friend Alex. We had so much fun and I was amazed at the number of vendors and millions of items for sale. We will definitely be going back soon!

There were so many fun things I wanted to buy. And some great things to text my husband = ) I found this huge pool light that was probably 4 feet long. Eric probably would have bought it in a second and hung it up in our house if it was another kind of beer. Good thing he didn't come with us.....


I should have taken pictures of all the other great things... next time!
I did come home with a few great things:


I bought 3 mini canning jars with galvanized lids, a little green oil lamp for the backyard, a ceramic snail to add to our garden, an antique purple glass doorknob, and a mini antique wash board.

I had to resist so many other things! Can't wait to go back!

Sunday, August 14, 2011

Gallery Wall How-To

It's been well over a year since we've gotten married and I've been wanting to a gallery wall of some of our wedding photos for quite some time.

I've been collecting frames from various thrift stores for a while and I finally got around to painting them white, green, and blue to go with our room. I posted about the rest of our room here and here.

I love monograms and wanted to incorporate our initials in the gallery wall. I found two skinny frames, put scrapbook paper behind the glass and glued painted letters on top. 


 The easiest way to do a gallery wall without putting a milllion holes in your wall is to plan it out with paper. I cut a piece of shipping paper in the exact size of each frame and taped them to the wall. This way you can play with the layout until you get it just how you like it.


Before I taped up each piece I marked where the hook was so they would hang just right.


Once I liked the layout I hammered a nail through each piece of paper where I had marked the hook.


Then I tore each piece of paper off and replaced it with the actual frame.


I'm so glad to finally have these frames up on the wall, now I just need to get a big print to put in the middle!


Next up: a padded headboard, then our room with be complete!

I'm linking up to CraftOManiac Monday!